One of the things I love about working in the Azure Cloud is the ability to have an enterprise infrastructure with as little on-premise infrastructure as possible, without necessarily blowing the budget – and for me, the final part of that jigsaw is the cloud directory. With just an internet connection we can build an organization with all the technical capabilities of a large enterprise without ever having to trip over cables in a comms room. Azure AD Domain services can be a great option for businesses looking for a light touch directory solution – with the robustness that traditional AD gives you.
While Azure AD has come leaps and bounds in the last 5 years, there are still a number of functions that requires an On-prem Active Directory (File share, AD authentication, GPO, NTLM, Kerb, VMs that needs to be domain joined, Azure Virtual Machines) – but unless I already have an on-Premise AD setup, If I was starting a new company today – I would opt for the Azure AD Domain Services and build around that where possible.
What is Azure AD Domain Services?
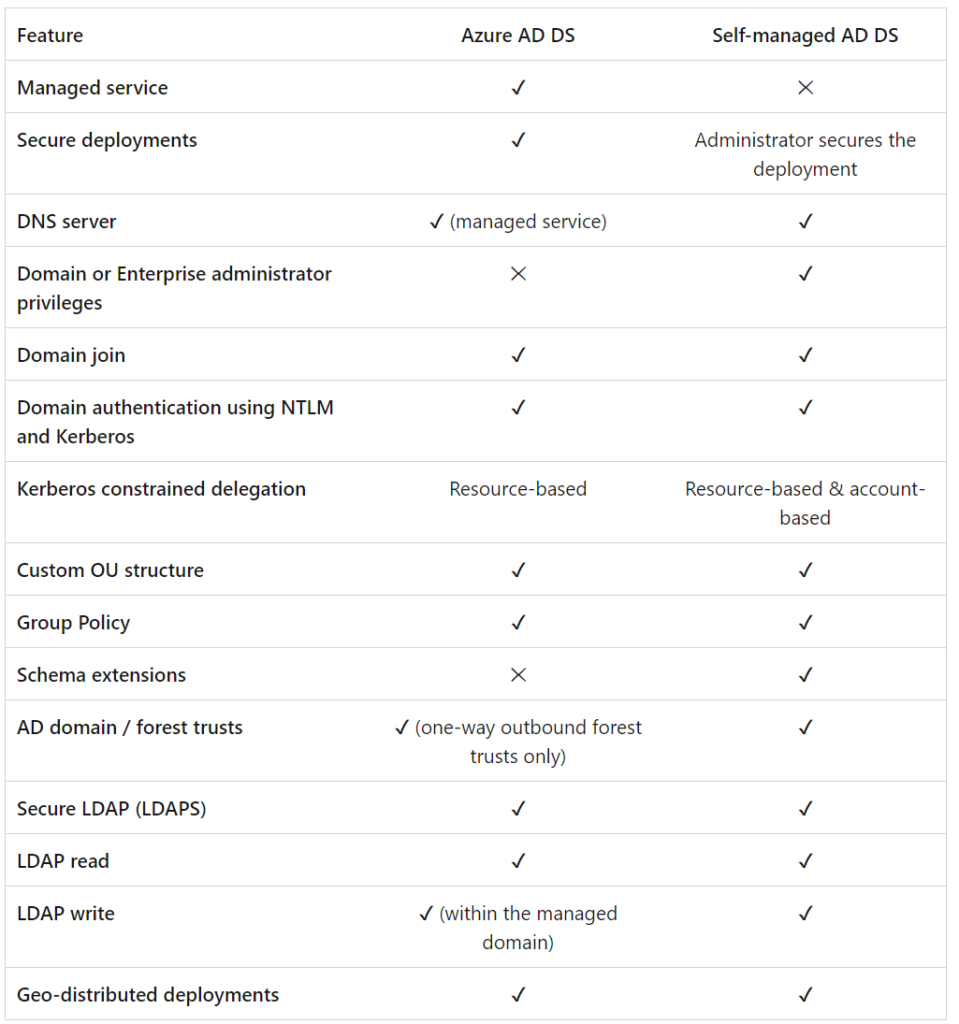
The simplest way to describe Azure AD DS is “Active Directory in the Cloud”, a Microsoft-managed Active Directory hosted in Microsoft Cloud. The main benefit of AADS for me ( above the technical features like GPO, NTLM, etc), is the fact that this is a PAAS service – so the core management and maintenance of the underlying infrastructure is essentially outsourced to Microsoft. The other main benefit for me is the simplicity of the setup, with an ok technical understanding we can stand up an instance within an hour. More information below detailing the features available with Azure AD Domain Services when compared to a standard AD Domain.


How much does it cost to run an Azure AD Domain Services instance?
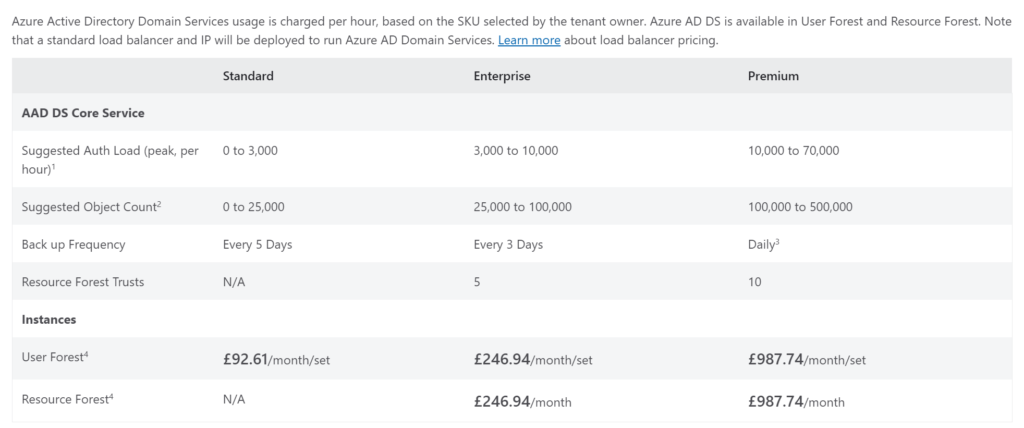
The standard SKU, which would be more than sufficient for a small to medium-sized organization will cost roughly £93 a month – which is a very affordable price point for what you get – especially when compared to the cost of implementing a similar AD setup ( both financial and technical/maintenance costs).

Setting up Azure AD Directory Services:
In this write-up, I am going to document my process for setting up AzureAD Domain services in my Azure Environment:
Step 1: Navigate to the Azure Portal Global Search
Step 2: Search for “Azure AD Domain Services” or navigate directly via this link

Step 3: Select “Create Azure AD Domain Services”

Step 4: Complete the basic details for the new AADDS instance
On the basic page, there is the option to determine what resource group to create the AADDS in and the DNS domain name for the AADDS instance – here the recommendation from MS is to use a unique routable domain to avoid any conflicts. Screenshot of the DNS name restrictions below:

For my setup, I am using a subdomain intended for my corporate services, and because this is an instance for a small business, the standard SKU is more than sufficient. Details below about the differences between the available SKUs:

Step 5: Configure Networking
For networking, you get the option to select an existing network or create a new virtual network/subnet. In my case the idea is to have all my core corporate services in the Corp virtual network – this will simplify my setup when I come to create a VPN for my corp. In a follow-up blog, I will be creating a Point-to-Site VPN, so that I can join my corporate end-user devices to the AADDS managed domain.

Step 6: Add Administrators
In the Administration tab, you can add any admin you want to add at this point – but you can always get to this later. By default, a new group called AAD DC Administrators is created and given administrative privileges on the domain managed domain. The Synchronization tab can be ignored for now as it’s greyed out – once the AADDS has been created we can scope the synchronization as required.
Step 7: Define Security Settings :
In the security settings tab – I am making a handful of additional changes above the default pre-selected settings in an attempt to make this as robust from a security POV as possible :
- Blocking non-TLS 1.2 connections (https://therecord.media/ietf-officially-deprecates-tls-1-0-and-tls-1-1/)
- Disabling NTLM V1 (https://blog.quest.com/ntlm-authentication-what-it-is-and-why-you-should-avoid-using-it )
- Disabling Kerberos RC4 (https://docs.microsoft.com/en-us/windows-server/security/kerberos/preventing-kerberos-change-password-that-uses-rc4-secret-keys)
- Enabling Kerberos Armoring
I am not an encryption/cryptography expert – so I have linked some useful blogs explaining why these settings might be better from a security POV, especially since this is a new environment being created, with no legacy dependencies that you’d have in a usual already established org infrastructure.

Once the required details have been filled in, click the review+create button, then go grab a coffee as it takes up to 45 minutes for the AADDS deployment to complete.

Post setup:
Once the AADDS creation is complete you get the prompt to update your DNS server settings with the AADDS IPs. What this does is set up the VNET associated with the AADDS domain to use custom DNS servers and the IP address is set to the managed domain’s IP addresses

After that, the next step is to set up Password Hash sync for Secure LDAP. To enable password hash synchronization for our users from Azure AD to the AADDS domain. This needs to be done before any of the synchronized users can sign in to the managed domain successfully – because when the users are initially created in the managed domain, they are essentially added without a password – all we need to do is reset the password for users we want to provision in AADDS -the password reset triggers the password hash synchronization. This can be done by forcing users to reset their passwords.
Adding a Resource Lock
While this is not an essential requirement, I have been burnt too many times – so I always make sure that I add a delete lock on any critical objects I create in Azure. This can be done by clicking on the “Lock” option under settings on the left side of the object info – and selecting the appropriate lock.

Synchronization settings
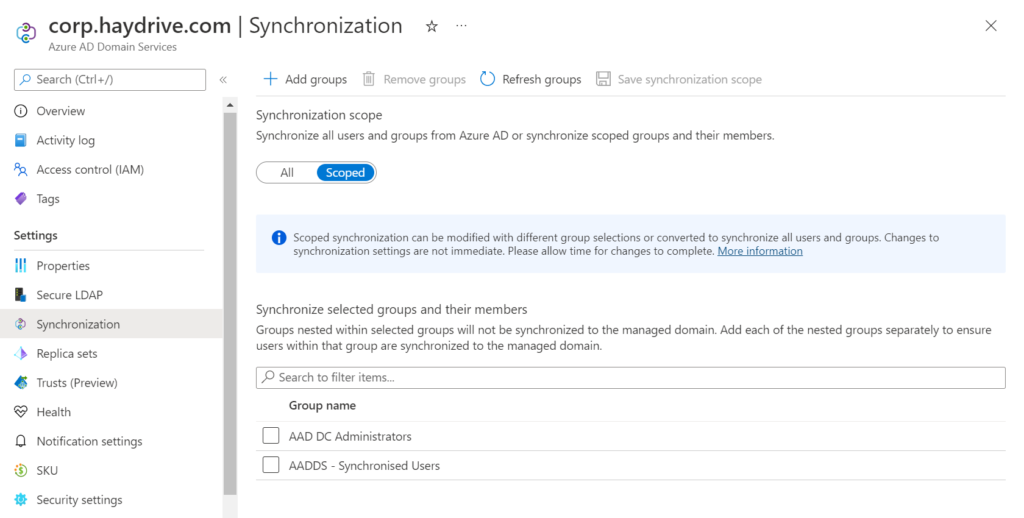
From personal experience I almost always avoid deploying any policy in Azure/M365 to all users, so the synchronization will be scoped to a specific security group “AADDS – Synchronized Users”. In most large environments there will be stale unrequired objects in Azure AD – so I want to make sure that only the users and groups I need are synchronized across.

To define synchonisation:
- Navigate to the AADDS Instance,
- Click on the Synchronization tab
- switch scope from all to scoped and select the appropriate security group – here you can see that the Administrator group is already pre-selected.
Uploading certificate for LDAP:
In the secure LDAP tab, you can configure settings for Secure LDAP – this is done by basically uploading a certificate that matches the AADDS domain name, in my case corp.haydrive.com. The certificate can be either a self-signed cert or one sourced from a certificate issuing authority. To create a self-signed certificate, follow the guide here:
Once the .PFX file has been added and password provided, click save, and Secure LDAP should be enabled and ready to go.

Summary
In this blog, I walked through the process of creating an Azure AD Domain Services Instance, configuring the DNS settings, setting up Secure LDAP on the managed domain, adding a resource lock, and resetting users’ passwords to ensure that synchronized users can sign in to the managed domain.
In a follow-up blog, I will go through the process of joining a VM to the managed domain, and installing AD management tools on the VM, so we can manage the directory – this will involve making some networking changes to allow my virtual machine to commnuicate with the AADDS instance.
Sources:
https://docs.microsoft.com/en-us/azure/active-directory-domain-services/tutorial-create-instance